The holiday season brings with it a special kind of magic, often centered around cherished traditions, festive decorations, and, of course, delicious treats. Among the plethora of seasonal sweets, Christmas tree Rice Krispie treats stand out as a beloved, family-friendly option. These delightful, no-bake creations are not only incredibly fun to make but also offer a gorgeous, edible centerpiece for any holiday gathering. Whether you're a seasoned baker or just looking for a quick and easy festive activity, crafting these adorable easy no-bake Christmas Tree Rice Krispies Treats for holidays is sure to bring smiles and holiday cheer.
From tinting the classic marshmallow-cereal mixture a vibrant green to adorning them with edible "ornaments" and a shimmering star, Christmas tree Rice Krispie treats offer endless opportunities for creativity. This comprehensive guide will walk you through everything you need to know, from making them from scratch to transforming pre-made bars, along with a sleigh-full of decoration ideas and insider tips for success.
Crafting Your Festive Trees: Homemade from Scratch
Diving into the homemade version of Christmas tree Rice Krispie treats allows for ultimate customization and that irresistible fresh-from-the-kitchen aroma. Making them from scratch gives you control over the texture, the intensity of the green hue, and even subtle flavor additions. It's a fantastic activity to involve the whole family, creating memories as sweet as the treats themselves.
Ingredients You'll Need:
- 4 ½ to 5 cups Rice Krispies cereal (or similar crispy rice cereal)
- 10 ounces mini marshmallows (about 6 cups) or 1 standard bag (about 40 regular-sized marshmallows)
- 4 tablespoons salted butter (European butter, if available, adds a richer flavor)
- Green food coloring (gel food coloring provides a more vibrant and concentrated color)
- Non-stick cooking spray
- Optional: Mini Reese's Peanut Butter Cups for tree trunks, assorted sprinkles, star candies, confectioner's sugar for "snow."
The Homemade Process: Stovetop or Microwave Method
Before you begin, line a large baking tray with parchment paper or wax paper, and generously spray a large mixing bowl and your spatula with non-stick cooking spray. This is your secret weapon against stickiness!
Stovetop Method:
- In a large saucepan, melt the salted butter over medium-low heat. Keep the heat gentle to prevent the butter from browning too quickly.
- Once about half the butter is melted, add all the marshmallows. Continue to stir constantly until most of the marshmallows have melted into a gooey, smooth consistency.
- Remove the saucepan from the heat and continue stirring vigorously. The residual heat will help fully melt any remaining marshmallow lumps, creating a perfectly smooth mixture.
- Stir in several drops of green food coloring until your desired shade of festive green is achieved. Remember, you can always add more, but you can't take it away!
Microwave Method:
- Place the butter and marshmallows in a large microwave-safe bowl (already sprayed with non-stick spray).
- Heat on high for 1 minute. Remove and stir well until the marshmallows begin to soften and melt.
- Return to the microwave for an additional 15-second interval. Let the bowl sit in the microwave for another minute, allowing the residual heat to work its magic.
- Stir the mixture very well until it's completely smooth and lump-free.
- Stir in the green food coloring until you achieve your desired vibrant Christmas tree hue.
Shaping Your Trees:
Once your green marshmallow mixture is ready, pour it over the Rice Krispies cereal in your pre-sprayed bowl. Mix thoroughly with your sprayed spatula until the cereal is evenly coated. Now comes the fun part: shaping!
- Allow the mixture to cool slightly until it's warm enough to handle comfortably but not too hot. Working with the mixture when it's still warm will make shaping much easier.
- Spray your hands lightly with non-stick cooking spray to prevent sticking.
- Scoop out about ½ cup of the mixture for each tree. First, pat it into a rough ball, then gently press and mold it into a pyramid or cone shape, tapering towards the top. For a more defined shape, you can press the base flat.
- Place the shaped treats onto your parchment-lined baking sheet.
- For best results, chill the formed trees for about 10-15 minutes in the refrigerator. This brief chilling period firms them up, making them much easier to refine and decorate without losing their shape.
The Speedy Route: Transforming Pre-Made Bars
For those short on time or seeking an even quicker path to festive delights, using pre-made Rice Krispies Treats Original bars is a fantastic shortcut. This method streamlines the process, focusing primarily on the creative decoration aspect. It's a testament to how versatile these treats are, proving that you don't always need to start from scratch to achieve a homemade look and feel.
Making Magic with Store-Bought Bars:
- Unwrap and Prepare: Unwrap individual Kellogg’s® Rice Krispies Treats® Original bars. Place them on a parchment-lined baking sheet, giving yourself plenty of room to work.
- Trim for Tree Shape: Using a sharp knife (a butter knife works well for kids), gently trim the corners of each rectangular bar, creating a triangular, tree-like shape. Don't worry about perfection; rustic trees add to the charm!
- Add Green Hue (Optional): While the homemade method incorporates green food coloring into the mix, you can still achieve a green effect with pre-made bars. A simple green frosting layer will give them their signature festive color.
This approach is perfect for spontaneous holiday crafting sessions or when you need a quick dessert for a school party. It allows you to skip the melting and mixing, jumping straight to the most visually rewarding part: decorating!
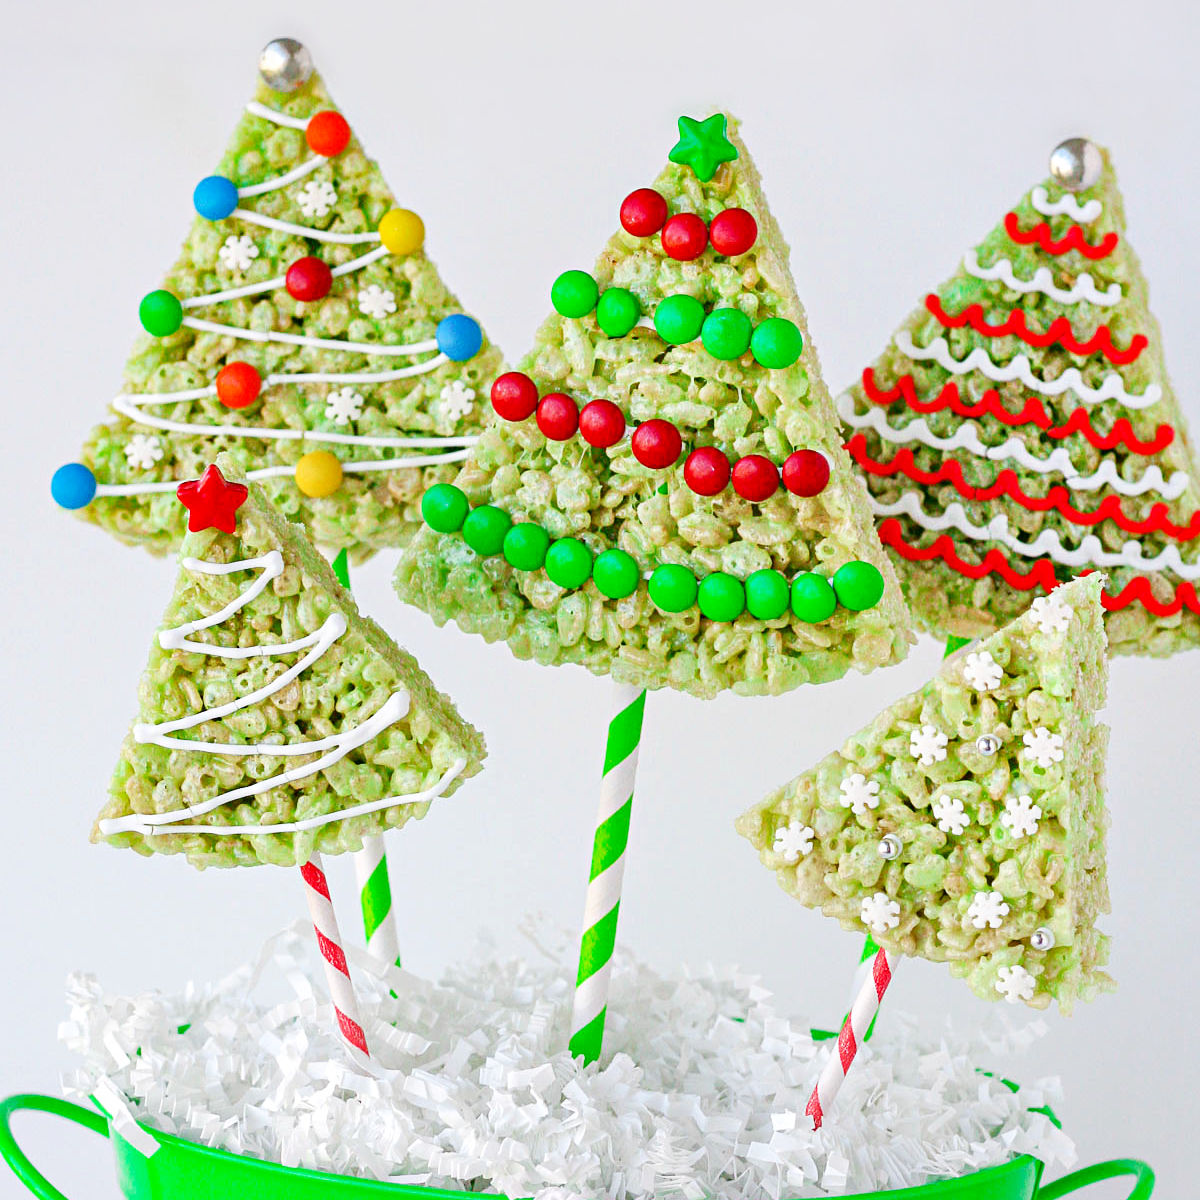
Decking the Boughs: Creative Decoration Ideas
This is where your Christmas tree Rice Krispie treats truly come to life! Think of each green triangle as a blank canvas, ready to be adorned with edible ornaments, garlands, and glistening snow. The key is to have fun and let your imagination run wild. For more inspiration on decorating with fun candies, check out this guide: DIY Christmas Tree Rice Krispie Treats: Decorate with Fun Candies.
Essential Decoration Elements:
- Green Frosting: If you didn't color your homemade treats green, or if you're using pre-made bars, green frosting is your first step.
- Piping Technique: Use a star tip attached to a piping bag for that classic textured tree look. Start by piping a row across the bottom of each tree, then pipe the next row slightly overlapping the first. Continue this technique until the entire tree is covered.
- Easy Alternative: Don't have a piping bag? No problem! Simply spoon the frosting into a plastic sandwich bag, snip off a small corner, and pipe away.
- Smooth Finish: For a smoother, modern look, you can simply spread the green frosting evenly over the surface with an offset spatula or knife.
- Sprinkles and Small Candies: These are your "ornaments"! Gently press multi-colored sprinkles, nonpareils, mini M&Ms, small candy pearls, or even tiny silver dragees into the frosting while it's still wet.
- Powdered Sugar "Snow": For a magical snowy effect, use a fine mesh strainer to dust confectioner's sugar lightly over your decorated trees. If you don't have a strainer, just hold a spoonful of powdered sugar over the treats and gently tap the spoon with your other hand.
- Tree Trunks: The most popular and delightful trunk option is a miniature chocolate-covered peanut butter cup (like a Mini Reese's). Simply unwrap it and gently press it, inverted, onto the base of each tree. Other options include small chocolate squares or even a short pretzel stick.
- Star Toppers: No Christmas tree is complete without a star! Place a star sprinkle, a tiny star-shaped candy, or even a small piece of yellow or gold candy on top of each tree.
Advanced Decorating Ideas:
- Edible Glitter: Add a touch of sparkle with edible glitter or luster dust.
- Chocolate Drizzle: Create "garlands" by drizzling melted white or dark chocolate over the green frosting.
- Candy Cane Pieces: Crush mini candy canes and sprinkle them for a peppermint crunch and festive look.
- Fondant Accents: For the truly artistic, small cut-out fondant shapes (like tiny presents or snowflakes) can add an extra layer of detail.
Tips for Success and Festive Variations
Making Christmas tree Rice Krispie treats is inherently forgiving, but a few insider tips can elevate your experience and ensure perfectly festive results every time.
Practical Tips for Perfect Treats:
- Non-Stick Spray is Your Best Friend: We cannot emphasize this enough! Spray your bowls, spatulas, and even your hands generously. It makes all the difference in handling the sticky marshmallow mixture and shaping the treats.
- Parchment Paper for Easy Cleanup: Lining your baking sheets ensures the treats don't stick and makes for super easy transfer and cleanup.
- Don't Over-Compress: When mixing the cereal and marshmallow, and especially when shaping, avoid pressing down too hard. Over-compressing can result in dense, hard treats instead of light and chewy ones.
- Chilling is Key: While not strictly necessary, a short chill time after shaping significantly helps the treats firm up, making them much easier to decorate without losing their form.
- Food Coloring Considerations: Gel food coloring provides a more intense, vibrant green with less liquid, preventing your treats from becoming soggy. Add it gradually until you reach your desired shade.
- Work Quickly: The marshmallow mixture starts to set as it cools, so try to mix and shape your treats efficiently.
Festive Variations to Try:
- Flavor Infusions: Add a few drops of peppermint extract or almond extract to your melted marshmallow mixture for an extra layer of holiday flavor. Vanilla extract is also a wonderful addition.
- Alternative Trunks: If peanut butter cups aren't your preference, use mini pretzel sticks, chocolate wafer cookies, or even small chocolate squares as tree trunks.
- Different Cereal: While Rice Krispies are classic, experiment with other crispy cereals for a unique texture or flavor profile.
- Individual Portions: For party favors, wrap each decorated tree in clear cellophane bags tied with festive ribbon.
- Gifting Ideas: Arrange a selection of these delightful trees on a decorative platter or in a festive box as a thoughtful homemade gift for neighbors, teachers, or friends.
- Involve the Kids: This is a perfect activity for little hands! Let them help with mixing (under supervision), shaping, and especially the decoration stage. It's a wonderful way to foster creativity and create lasting holiday memories.
The beauty of Christmas tree Rice Krispie treats lies in their simplicity and endless possibilities. Whether you opt for the full homemade experience or a speedy pre-made bar transformation, the joy of decorating these festive confections is undeniable. They are a delightful embodiment of holiday spirit, offering a sweet, crunchy, and visually stunning addition to your holiday dessert table.
So, gather your ingredients, unleash your creativity, and get ready to craft a batch of these enchanting Christmas tree Rice Krispie treats. They're not just a dessert; they're an experience, a memory in the making, and a delicious way to celebrate the most wonderful time of the year!
